| 일 | 월 | 화 | 수 | 목 | 금 | 토 |
|---|---|---|---|---|---|---|
| 1 | 2 | 3 | 4 | 5 | 6 | |
| 7 | 8 | 9 | 10 | 11 | 12 | 13 |
| 14 | 15 | 16 | 17 | 18 | 19 | 20 |
| 21 | 22 | 23 | 24 | 25 | 26 | 27 |
| 28 | 29 | 30 | 31 |
- 스프링 부트
- 카테부
- 정처기
- 배포
- 엘라스틱빈스톡
- 스프링부트
- 디자인패턴
- BFS
- 카카오테크 부트캠프
- 골드4
- 도커
- 한국전자통신연구원
- 골드3
- DP
- 골드5
- Express
- DFS
- aws
- 코딩테스트 고득점 kit
- 자바
- 인스턴스
- 대전
- 정보처리기사
- 자료구조
- 알고리즘
- EC2
- 프로그래머스
- ETRI
- 백준 알고리즘
- express.js
JUINTINATION
Express.js와 Prisma ORM + MySQL 본문
현재 진행중인 스퍼트 프로젝트의 조건 중 MySQL + Prisma ORM + 3개 테이블 이상(1:N, M:N, 최소 하나) + ERD이 있었다. 이를 위해 먼저 Prisma가 무엇인지 알아보고 기본적인 CURD API를 만들어보도록 하겠다.
ORM이란?
ORM(Object Relational Mapping)은 "객체로 연결을 해준다"라는 의미로 어플리케이션과 데이터베이스 연결 시 SQL언어가 아닌 어플리케이션 개발언어로 데이터베이스를 접근할 수 있게 해주는 툴이다. 즉, 어떤 객체를 schema로 정의한 다음 server side쪽에서 데이터 베이스를 CRUD가능하도록 해주는 매개체이다. SQL문법 대신 어플리케이션의 개발언어를 그대로 사용할 수 있게 함으로써, 개발 언어의 일관성과 가독성을 높여준다는 장점을 갖고 있다.
Prisma란?
Prisma는 Node.js와 TypeScript용 ORM으로 공식 문서에 따르면 Prisma는 아래의 구성 요소로 이루어져 있다.
- Prisma Client: Auto-generated and type-safe query builder for Node.js & TypeScript
- Prisma Migrate: Migration system
- Prisma Studio: GUI to view and edit data in your database
앞서 언급한 것처럼 Node.js에서 Prisma ORM을 사용해 MySQL과 연동해볼 것이다.
Prisma 및 MySQL 설치
먼저 MySQL이 설치되지 않았다면 $ brew install mysql 커맨드를 실행하여 홈브루에서 설치한다. $ brew install mysqlworkbench 커맨드를 실행하여 워크벤치도 같이 설치하면 도움이 될 것이다.
이후에 Express.js 프로젝트를 생성하고 다음의 커맨드를 순서대로 실행한다. 나는 $ express crud-test 커맨드를 실행하고 crud-test 디렉터리로 이동하여 $ npm install express 커맨드, 그리고 $ npm init -y 커맨드를 순서대로 입력하여 프로젝트를 생성하였고
이후에 $ npm install prisma @prisma/client 커맨드를 실행한 이후에 $ npx prisma init 커맨드를 실행하였다.
위의 커맨드를 모두 실행하면 프로젝트 루트 디렉토리에 다음 두 개의 파일이 생성된다.
prisma/schema.prisma
// This is your Prisma schema file,
// learn more about it in the docs: https://pris.ly/d/prisma-schema

generator client {
  provider = "prisma-client-js"
}

datasource db {
  provider = "postgresql"
  url      = env("DATABASE_URL")
}
.env
# Environment variables declared in this file are automatically made available to Prisma.
# See the documentation for more detail: https://pris.ly/d/prisma-schema#accessing-environment-variables-from-the-schema

# Prisma supports the native connection string format for PostgreSQL, MySQL, SQLite, SQL Server, MongoDB and CockroachDB.
# See the documentation for all the connection string options: https://pris.ly/d/connection-strings

DATABASE_URL="postgresql://johndoe:randompassword@localhost:5432/mydb?schema=public"
.env 파일 작성
.env 는 데이터베이스 연결을 위한 환경변수를 정의할 때 사용하는 파일이며 나는 mysql을 사용할 것이므로 MySQLWorkbench에서 테스트용 db를 create한 후에 .env 파일을 다음과 같이 수정하면 된다.
# Environment variables declared in this file are automatically made available to Prisma.
# See the documentation for more detail: https://pris.ly/d/prisma-schema#accessing-environment-variables-from-the-schema

# Prisma supports the native connection string format for PostgreSQL, MySQL, SQLite, SQL Server, MongoDB and CockroachDB.
# See the documentation for all the connection string options: https://pris.ly/d/connection-strings

DATABASE_URL="mysql://[user]:[pw]@[host]:[portNum]/[dbName]"
MySQL 계정을 [user] 대신 넣고 비밀번호를 [pw] 대신 집어넣으면 된다. 나는 로컬 호스트에서 돌릴 것이기 때문에 [host]에 localhost를 적을 것이고 다른 host에서 돌릴 것이라면 [host] 부분을 바꾸면 된다. 또한 포트 번호의 보통 기본 설정은 3306으로 되어 있지만 다른 포트 번호를 쓴다면 [portNum] 부분을 바꿔주면 되고 'prisma_test_db' 가 아닌 다른 이름으로 db를 생성했다면 [dbName] 부분을 바꿔주면 된다.
Prisma Schema 파일 작성
prisma/schema.prisma 는 Prisma 설정을 위한 메인 파일이며, 아래의 사항을 설정할 수 있다.
- Data sources: Prisma가 연결해야하는 데이터베이스에 접속 시 필요한 정보를 정의
- Generators: Prisma Client를 기반으로 생성되어야 하는 클라이언트를 정의
- Data model definition: 데이터 모델(테이블)을 정의
나는 mysql을 사용할 것이기 때문에 schema.prisma의 Data sources 부분을 다음과 같이 수정했다.
// This is your Prisma schema file,
// learn more about it in the docs: https://pris.ly/d/prisma-schema

generator client {
  provider = "prisma-client-js"
}

datasource db {
  provider = "mysql"
  url      = env("DATABASE_URL")
}
url은 아까 .env 파일에서 입력했던 "mysql://[user]:[pw]@[host]:[portNum]/[dbName]"를 그대로 써도 되지만 위와 같이 적어도 자동으로 가져오기 때문에 저런 식으로 적는 것이 나중에 유지보수적인 측면에서 더 좋을 것이다.
Generators 부분은 따로 건드리지 않고 Data model definition 부분을 위의 링크에서 확인할 수 있는 예시 그대로 적어보았다.
model User {
  id      Int      @id @default(autoincrement())
  email   String   @unique
  name    String?
  role    Role     @default(USER)
  posts   Post[]
  profile Profile?
}

model Profile {
  id     Int    @id @default(autoincrement())
  bio    String
  user   User   @relation(fields: [userId], references: [id])
  userId Int    @unique
}

model Post {
  id         Int        @id @default(autoincrement())
  createdAt  DateTime   @default(now())
  updatedAt  DateTime   @updatedAt
  title      String
  published  Boolean    @default(false)
  author     User       @relation(fields: [authorId], references: [id])
  authorId   Int
  categories Category[]
}

model Category {
  id    Int    @id @default(autoincrement())
  name  String
  posts Post[]
}

enum Role {
  USER
  ADMIN
}
홈페이지에서 볼 수 있는 해당 db에 있는 테이블의 관계를 나타낸 ERD는 아래와 같다.

이후에 이 프로젝트가 있는 위치에서 $ npx prisma migrate dev --name [nameOfMigration] 커맨드를 실행하면 마이그래이션 파일이 생성되고 db에 적용된다.
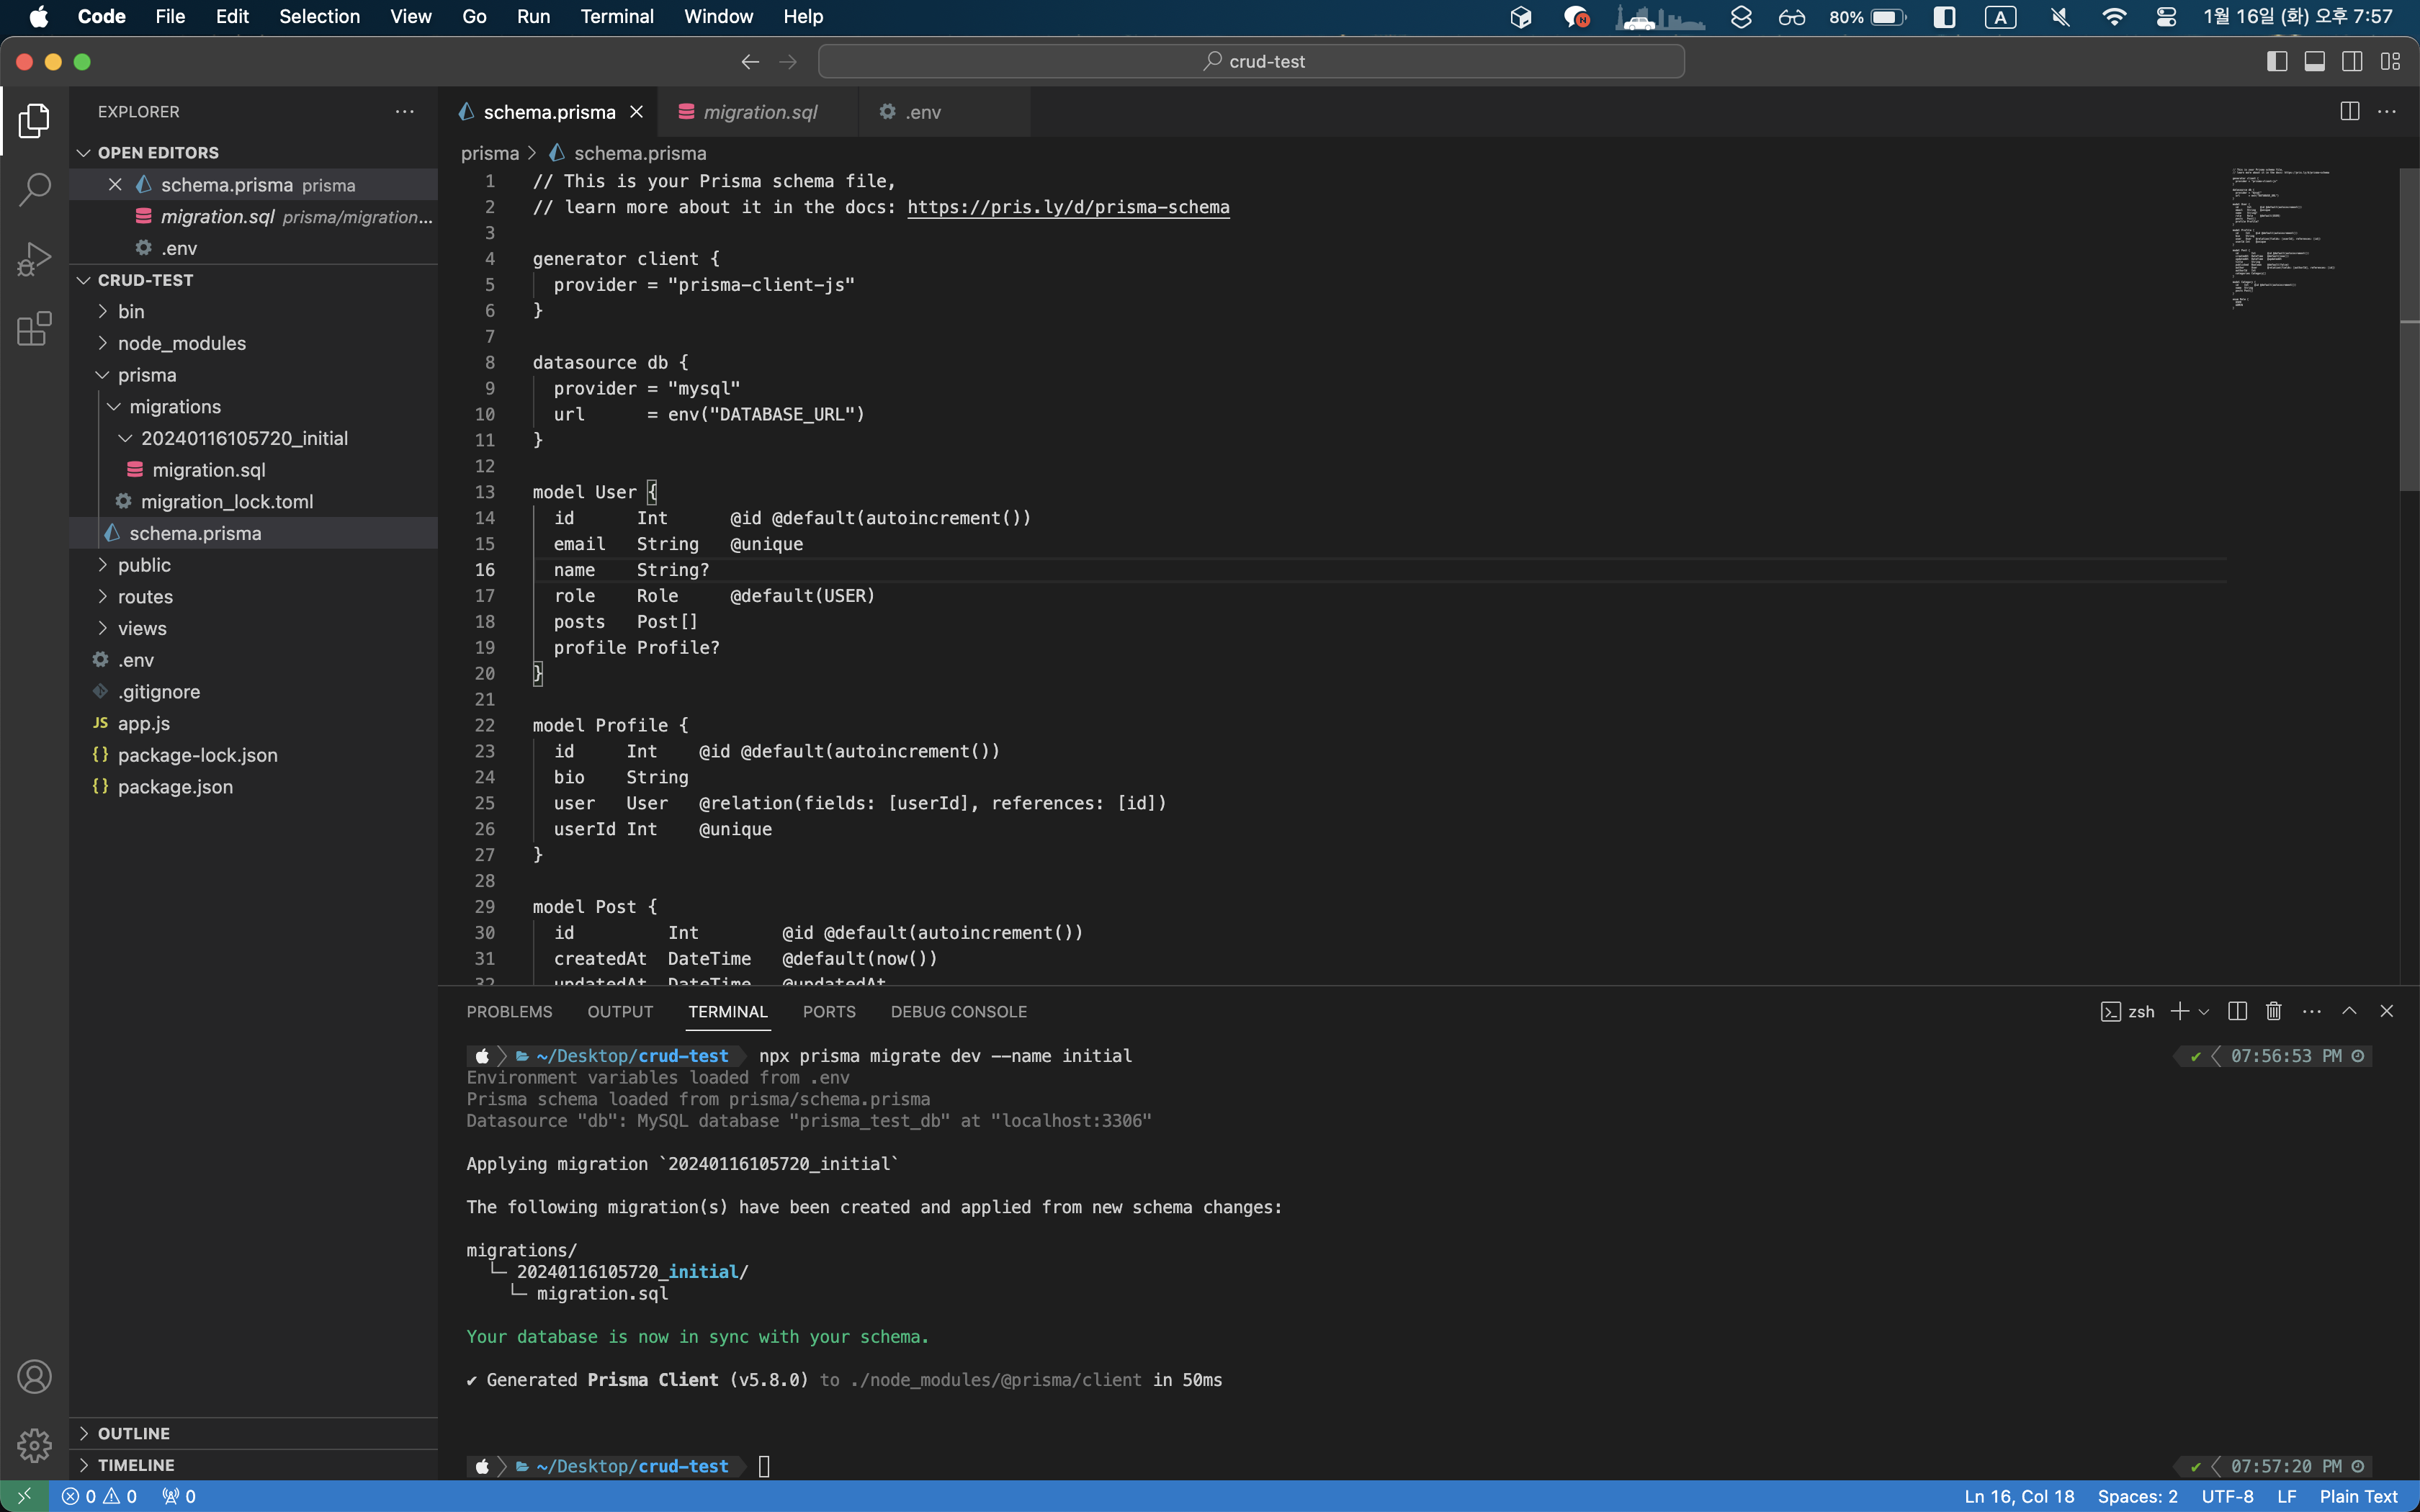
나는 vscode에서 $ npx prisma migrate dev --name initial 커맨드를 입력하였고 아래 사진처럼 20240116105720_initial 디렉터리에 migration.sql 파일이 생성된 것을 볼 수 있다. $ npx prisma migrate deploy [nameOfMigration] 커맨드를 실행하면 원하는 마이그래이션 파일로 덮어씌울 수 있고 $ npx prisma db pull 커맨드 실행을 통해

원래는 $ npx prisma db push 커맨드를 실행하여 바로 db에 덮어씌울 수도 있지만 해당 커맨드는 마이그래이션 파일을 생성해주지 않는데 예를 들어 테이블을 수정했을 때 연관관계에 문제가 생겼을 때 이전 마이그래이션 파일이 존재하지 않는다면 처음부터 끝까지 모든 테이블을 분석하는 상황이 발생할 수도 있기 때문에 잘 쓰지 않는다.

$ npx prisma db push 커맨드를 실행하지 않았음에도 실제로 Tableplus에 해당 db를 연결해봤을 때 테이블은 제대로 생성된 것을 확인할 수 있다. 제대로 적용됐는지 확인하기 위해 app.js 를 다음과 같이 수정해보자.
const { PrismaClient } = require('@prisma/client');

const prisma = new PrismaClient();

async function main() {
  console.log(await prisma.user.findMany());
}

main();
이후에 $ node app.js 커맨드를 실행하여 확인해보면 에러없이 잘 실행되는 것을 확인할 수 있다.

그러면 schema.prisma에 Temp 라는 테이블을 추가하고 app.js 파일도 다음과 같이 추가해보자.
const { PrismaClient } = require('@prisma/client');

const prisma = new PrismaClient();

async function main() {
  console.log(await prisma.user.findMany());
  console.log(await prisma.temp.findMany());
}

main();
// This is your Prisma schema file,
// learn more about it in the docs: https://pris.ly/d/prisma-schema
generator client {
provider = "prisma-client-js"
}
datasource db {
provider = "mysql"
url = env("DATABASE_URL")
}
model User {
id Int @id @default(autoincrement())
email String @unique
name String?
role Role @default(USER)
posts Post[]
profile Profile?
}
model Profile {
id Int @id @default(autoincrement())
bio String
user User @relation(fields: [userId], references: [id])
userId Int @unique
}
model Post {
id Int @id @default(autoincrement())
createdAt DateTime @default(now())
updatedAt DateTime @updatedAt
title String
published Boolean @default(false)
author User @relation(fields: [authorId], references: [id])
authorId Int
categories Category[]
}
model Category {
id Int @id @default(autoincrement())
name String
posts Post[]
}
model Temp {
id Int @id @default(autoincrement())
}
enum Role {
USER
ADMIN
}
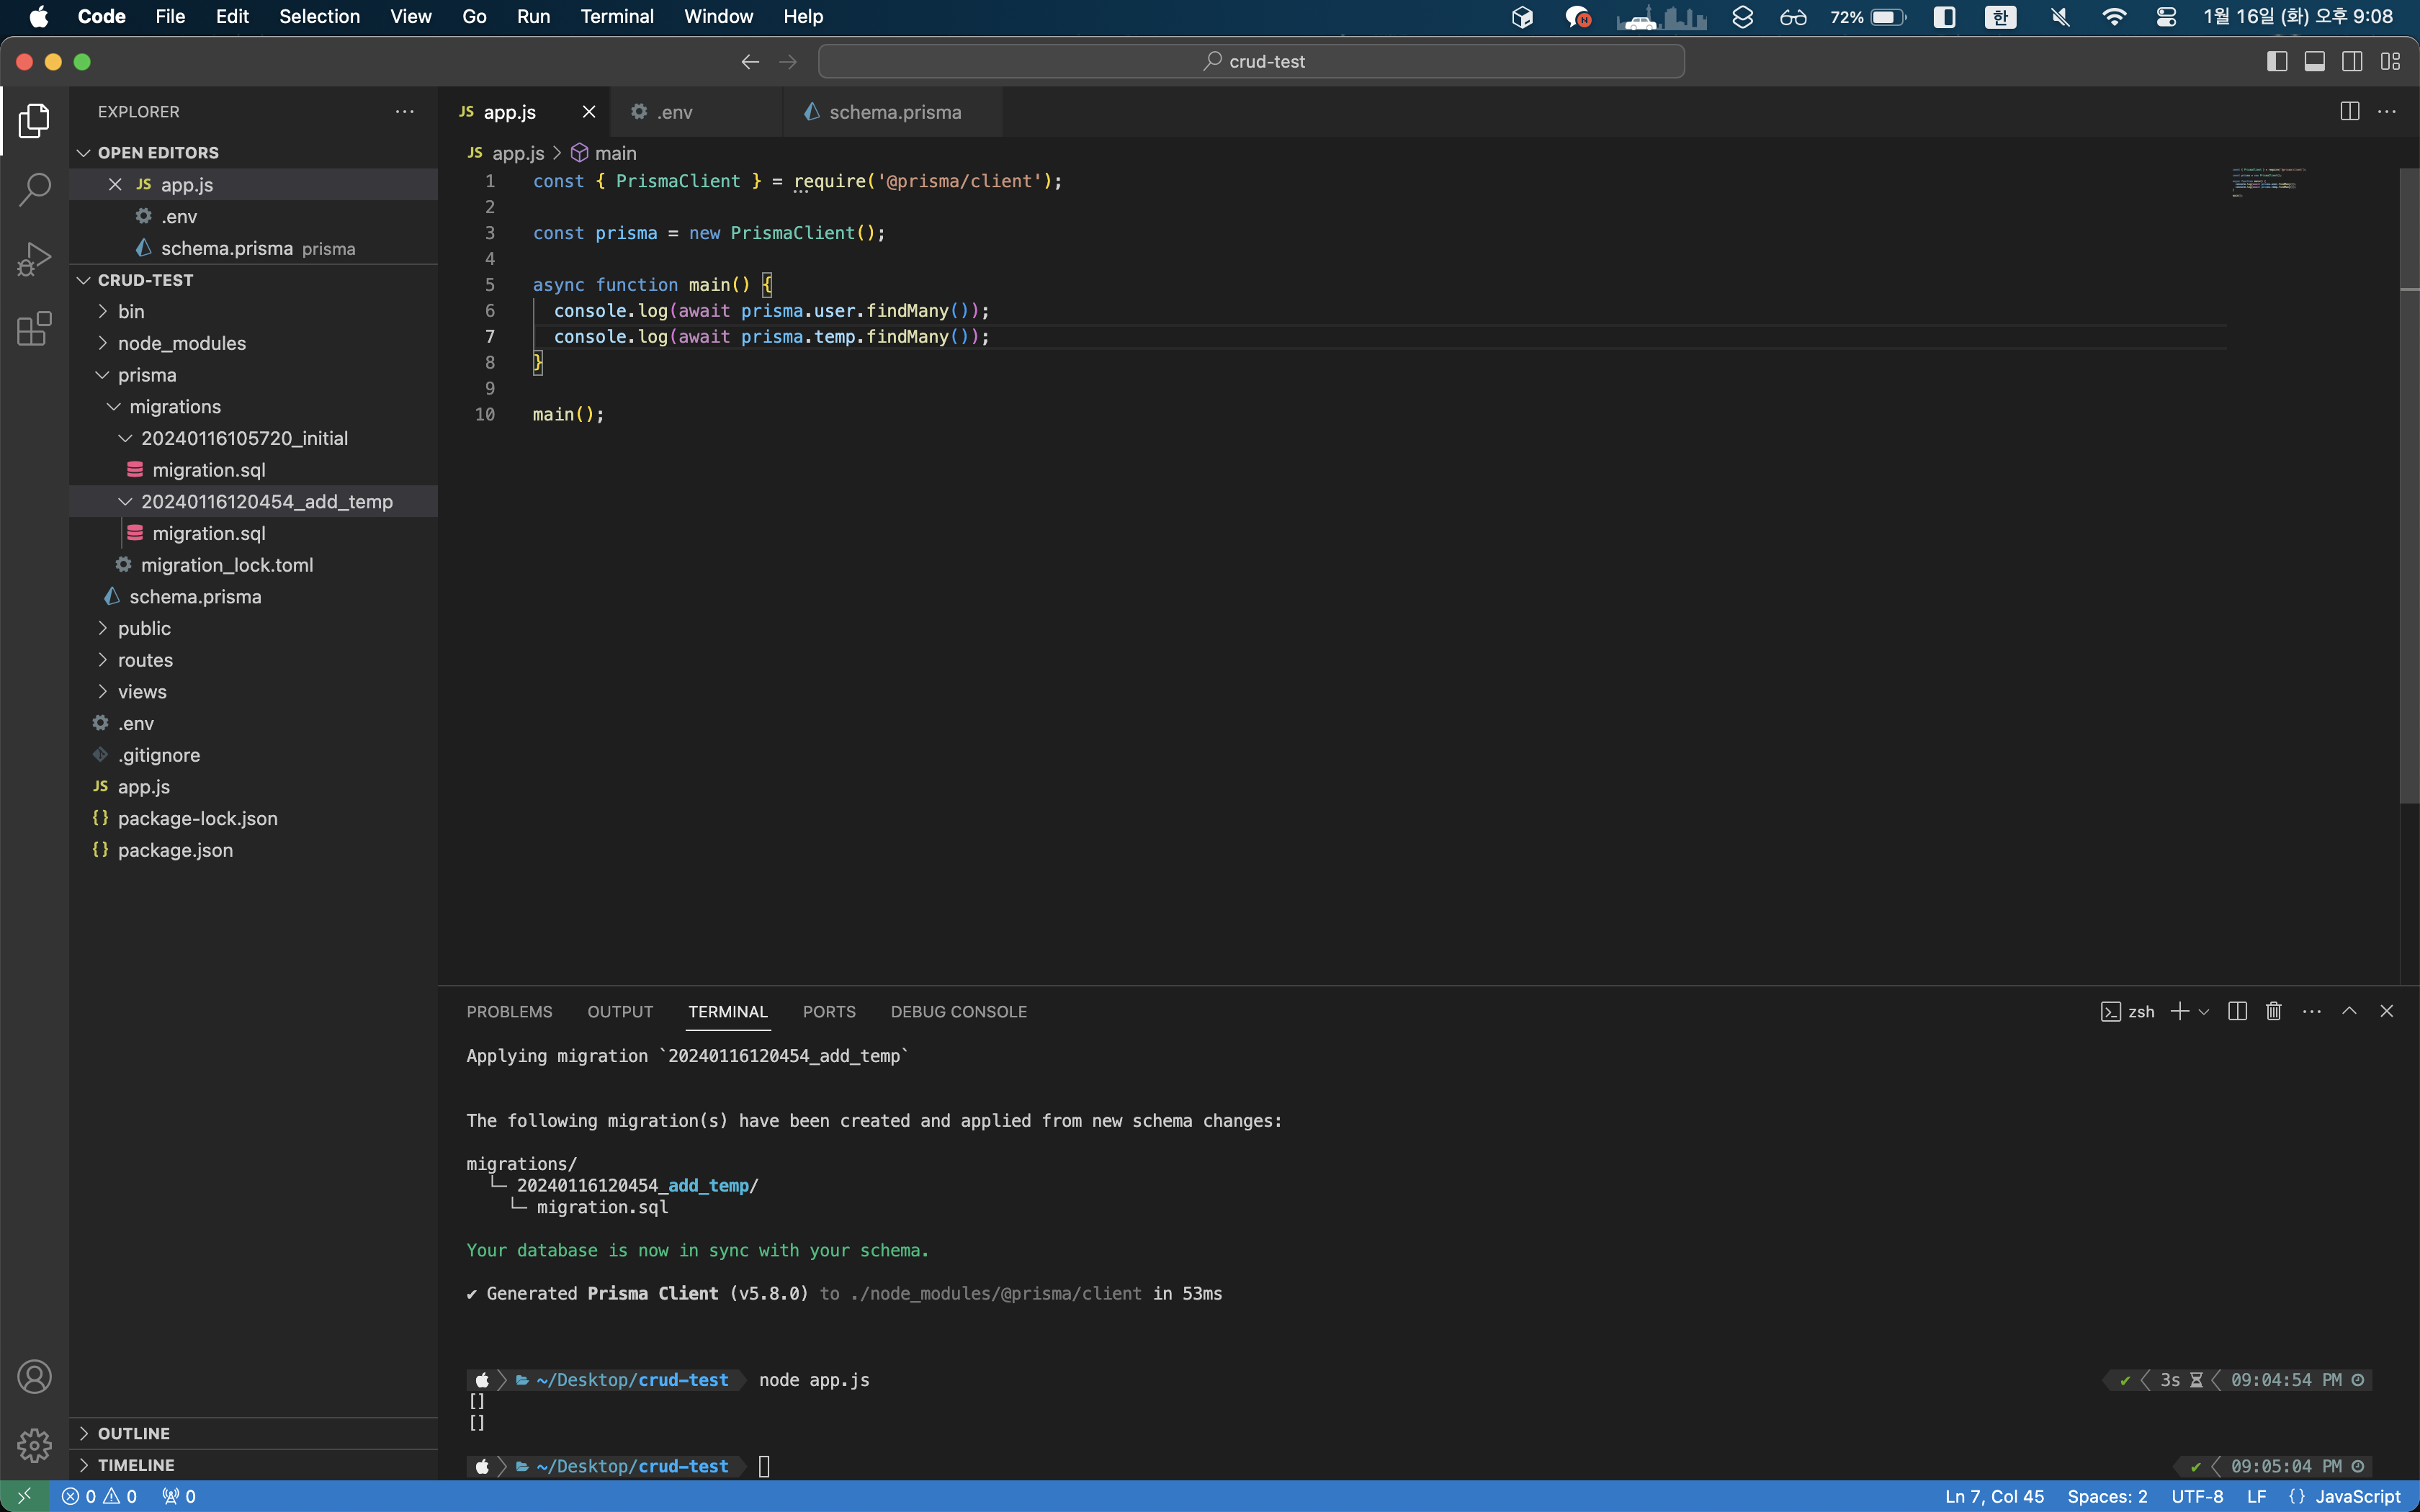
이후에 $ node app.js 커맨드를 다시 실행하여 확인해보면 2번째부터 오류가 발생하는 것을 확인할 수 있다. 그러면 $ npx prisma migrate dev --name add_temp 커맨드를 실행하여 db에 적용한 뒤에 다시 $ node app.js 커맨드를 실행해보면 정상적으로 작동하는 것을 확인할 수 있다.
추가적으로 $ npx prisma generate 커맨드는 언제 쓰이는 건지 이것저것 실험해봤는데 $ npx prisma db push 커맨드를 실행하던 $ npx prisma migrate dev --name add_temp 커맨드를 실행하던 자동으로 실행되는 것 같다. 그래서 따로 $ npx prisma generate 커맨드를 추가적으로 실행할 필요는 없는 것 같다.

결론
Prisma ORM에 대해 알아봤는데 생각보다 정보가 많지 않아서 좀 헤맸던 것 같다. $ npx prisma generate 커맨드는 정확히 어떤 역할을 하는지는 추후에 알아볼 시간이 생긴다면 더 알아보도록 하겠다. 다음 글은 아마 이 Prisma ORM으로 CRUD API를 만드는 글이 될 것이다.
스터디 그룹에서 지금까지 정리한 Node.js + Express.js 관련 글에 대한 피드백을 받았는데 그 피드백은 언제쯤 적용할 수 있을지 모르겠지만.. 시간이 날 때마다 꾸준히 업데이트해보도록 하겠다.
'StudyNote' 카테고리의 다른 글
| Express.js와 Prisma ORM을 사용한 CRUD API (0) | 2024.01.20 |
|---|---|
| Node.js와 Express.js 가볍게 입문해보기 - 4 (0) | 2024.01.19 |
| Node.js와 Express.js 가볍게 입문해보기 - 3 (1) | 2024.01.15 |
| Node.js와 Express.js 가볍게 입문해보기 - 2 (0) | 2024.01.14 |
| Node.js와 Express.js 가볍게 입문해보기 - 1 (2) | 2024.01.14 |
